A Comprehensive Guide
3D PRINTING SURFBOARDS
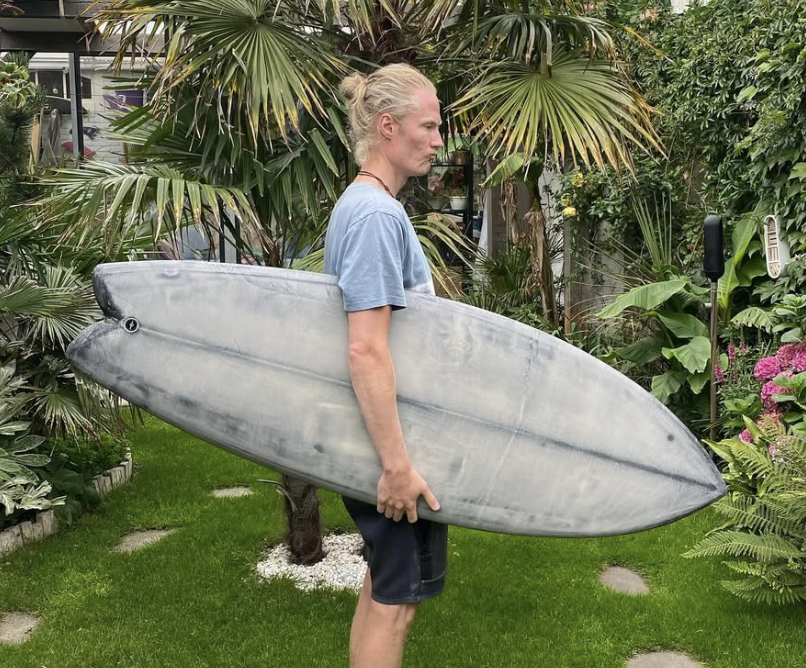
Dzjie Foils - Belgium
"This technology is opening doors to new ways of shaping boards, and AkuShaper puts it right in my hands."
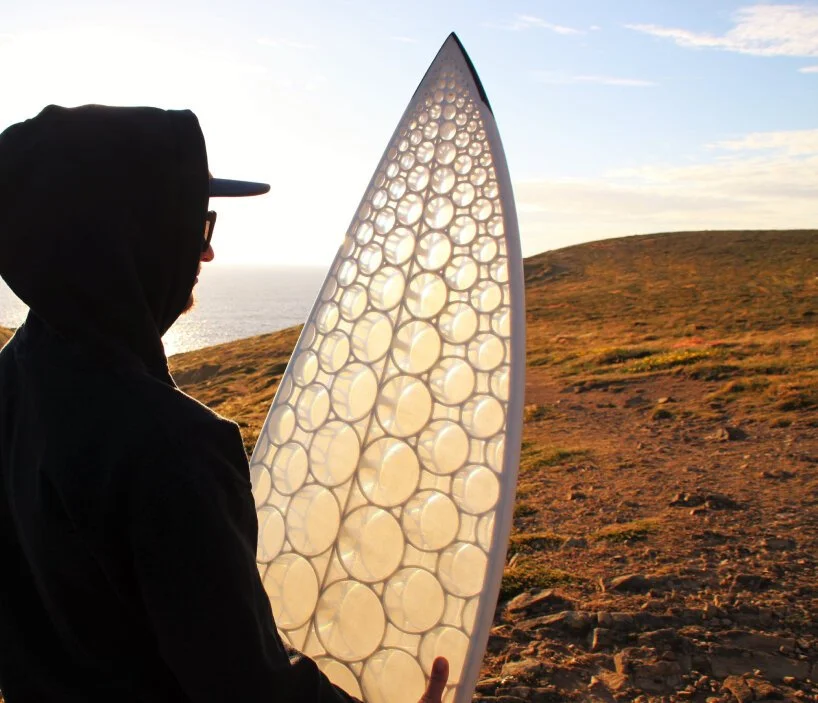
"AkuShaper makes designing and 3D printing surfboards surprisingly easy. You can take a shape from concept to prototype without the traditional tools, and even experiment with eco-friendly materials. It’s an exciting alternative for shapers who want to innovate, reduce waste, and bring their ideas to life in a more sustainable way."
3D Printing Surfboards with AkuShaper
Download AkuShaper to get started.
In this article:
Learn about designing and 3D printing surfboards with AkuShaper.
Learn about the various export types available in the software. Export STL, OBJ, IGES, PDF, DXF files.
Learn printer setups, workflow, tips, and examples for surfboard 3D printing.
3D Printing Surfboards | AkuShaper – Export, Design & Print
Ever wanted to see your surfboard idea go from screen to shell? AkuShaper lets you design your custom surfboard and export it in formats like STL, OBJ, IGES, PDF, and DXF—giving you full control over how to take it into the 3D printing world.
Why 3D-print a surfboard?
Rapid prototyping & iteration (Especially when combined with surfboard specific design software like AkuShaper)
Custom shapes and small batch boards
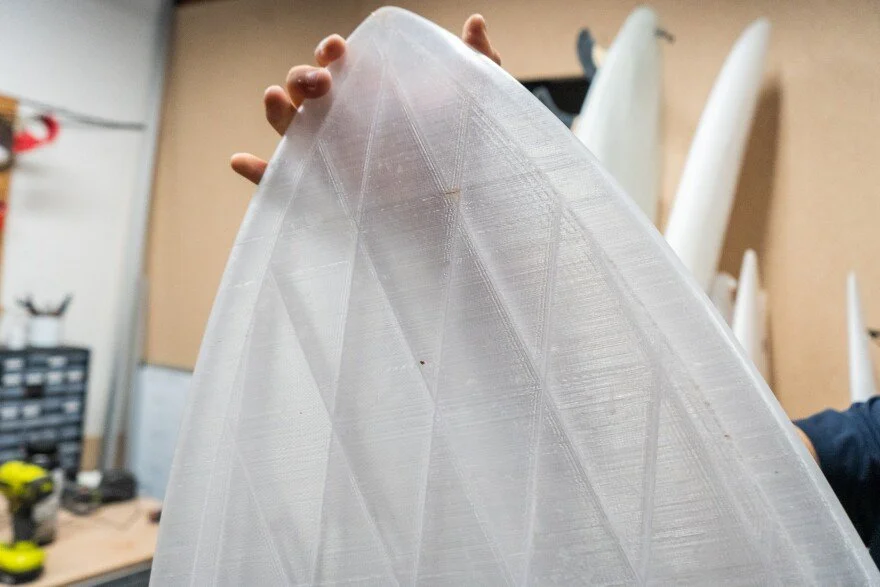
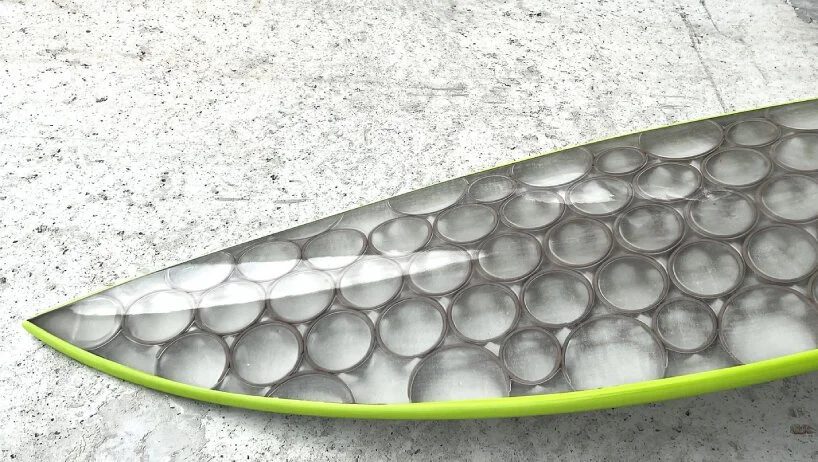
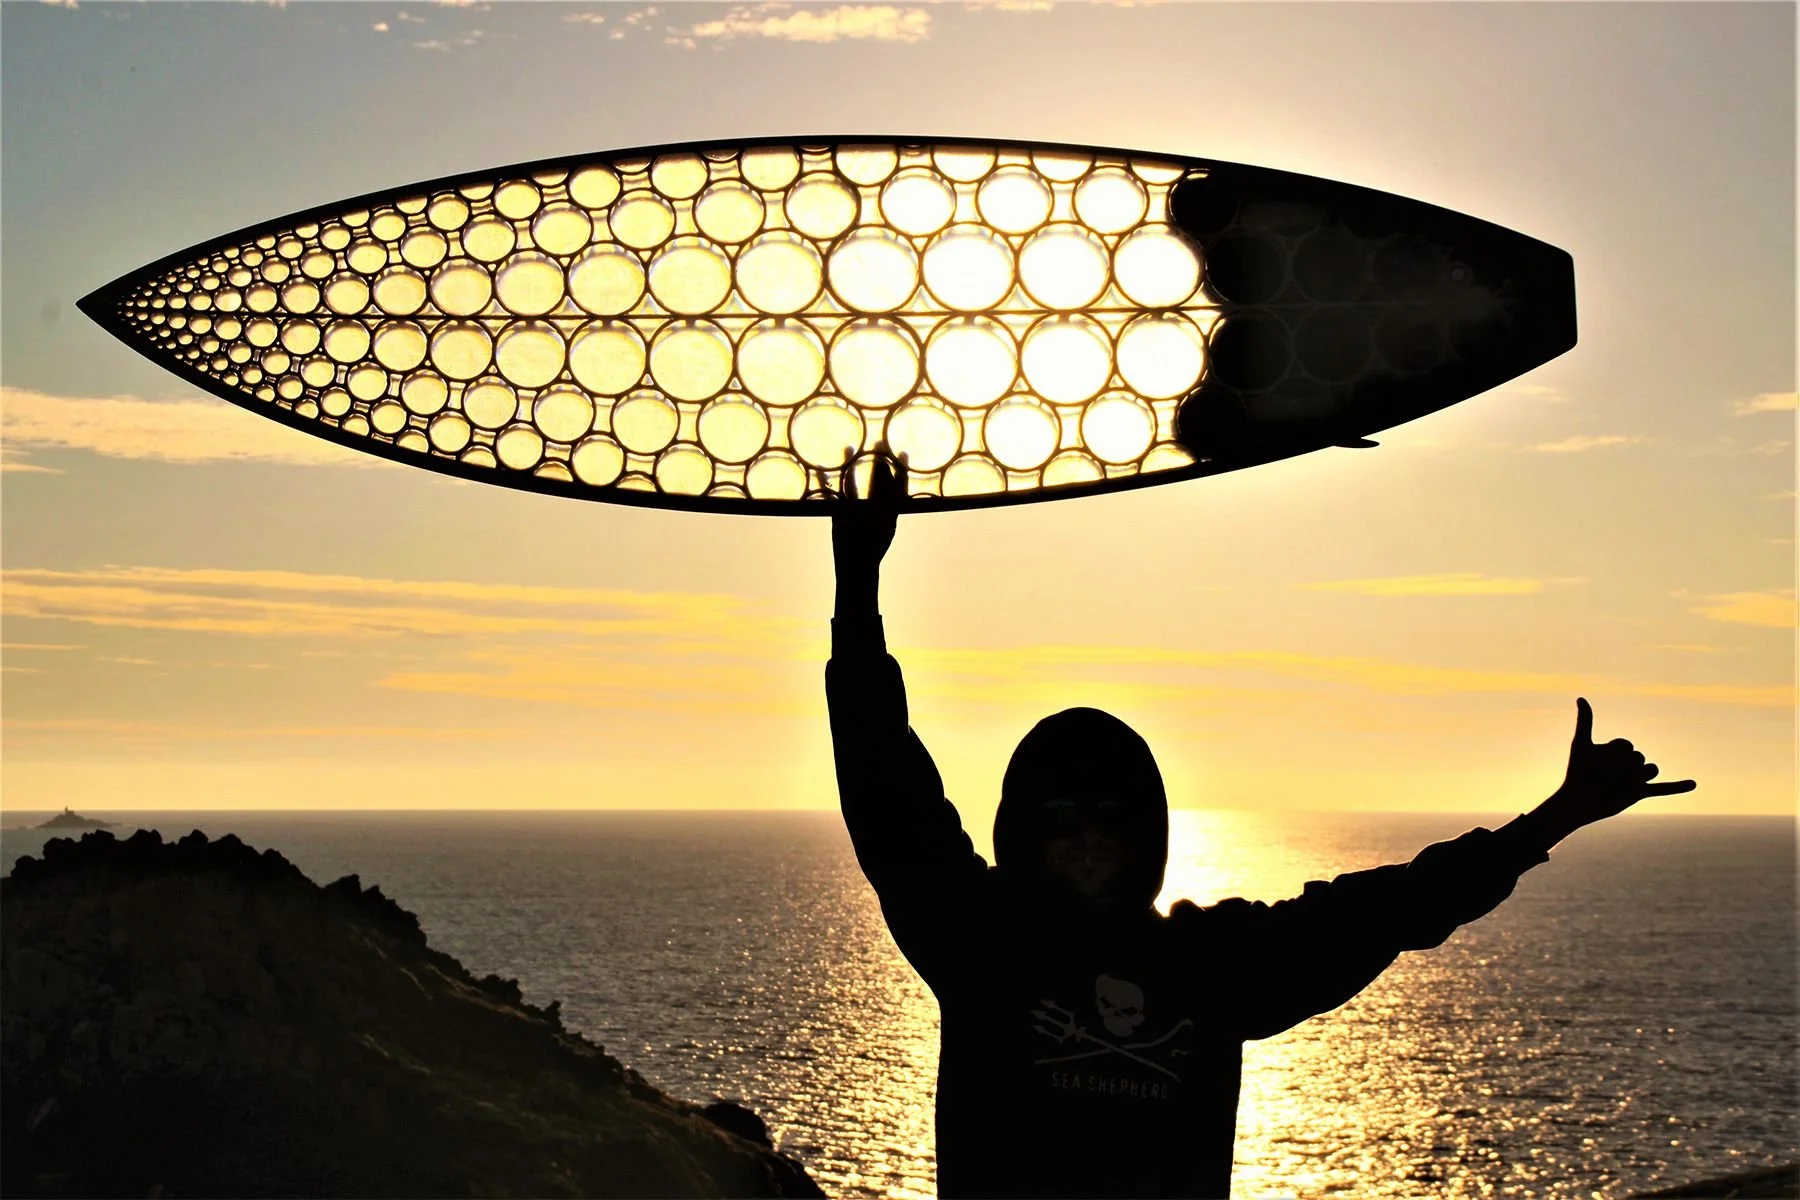
Custom Hollow / lattice interiors for weight savings
Eco / recycled filament possibilities (e.g. PETG, bio-based plastics)
Rapid iteration, custom shapes, internal lattice structures, and eco-filament possibilities make 3D printing a compelling tool in surfboard prototyping. Companies like Swellcycle are printing hollow boards from plant-based material in Santa Cruz
Read: Santa Cruz Startup 3D Prints Surfboards From Recycled Hospital Trays
How the process works with AkuShaper:
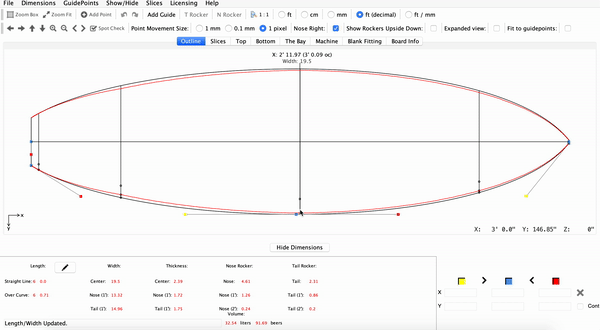
Design your shape, rocker, rails, and foil in the software. Learn about prototyping designs here: Introductory Tutorial Series
Export as STL, OBJ, IGES, PDF, or DXF
Import into your slicing software (Cura, PrusaSlicer, etc.)
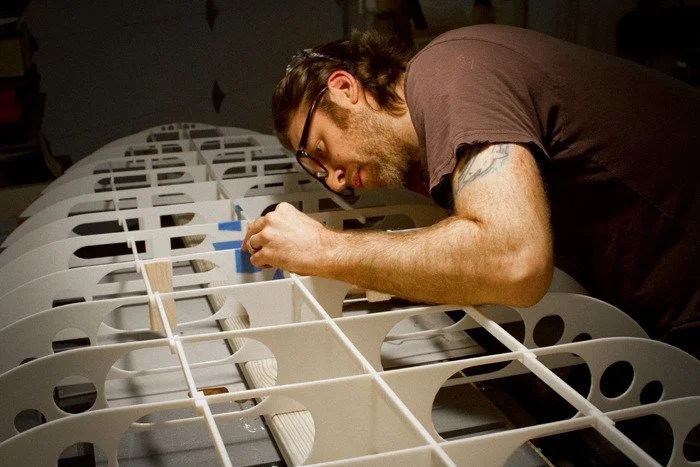
Print in sections if needed, using alignment pins or interlocking features
Glue, sand, seal, glass, and finish
AkuShaper Supported formats:
STL – standard for 3D printing; good for slicing.
OBJ – supports meshes with texture or color, useful in visualization workflows.
IGES / STEP (or .IGS) – CAD-compatible formats, useful if you want to import into engineering tools or refine surfaces.
PDF / DXF – for outline or 2D cross-sections, CNC, or reference.
Suggested uses for each file format:
For 3D printing: STL is primary, OBJ as alternative.
For further CAD editing or finite-element work: IGES / STEP. According to conversion guides, exporting from mesh to IGES is nontrivial and sometimes requires remodelling. McNeel Forum+1
For reference drawings or 2D shapes use PDF, DXF.
AkuShaper gives the flexibility to choose the right format for your path.
Workflow: Design to Print
Design in AkuShaper
Create surfboard outline, rails, rocker, foil, etc.
Use built-in volume / thickness tools to hit desired liters.
Export files
Choose the export format depending on your downstream workflow (STL, OBJ, IGES, etc.).
For multi-piece printing, slice the model or split it into printable panels (if your printer build volume is limited).
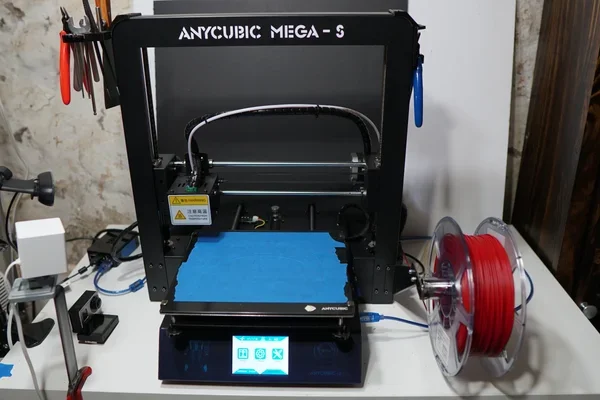
Prepare & slice
Import STL or OBJ into slicing software (Cura, PrusaSlicer, Simplify3D, etc.).
Set shell thickness, infill, supports, layer height.
If hollowing, use “shell” options or internal lattice. Some hobbyists use alignment pins or internal features. Instructables+1
Print
Choose suitable filament (e.g. PETG, high-strength PLA, bio-resins).
Use consistent temperature, proper bed adhesion, proper cooling.
Monitor print, adjusting for warping or layer shifting.
Post-print processing
Remove supports, sand edges, align parts, glue / bond sections.
Seal / make waterproof (epoxy, lamination).
Glass and finish similarly to traditional surfboard finishing.
Testing & iteration
Test in the water, gather feedback, tweak design, re-export, reprint.
Tip:
Use mid- to large-format FDM printers. Print in modular segments. Keep shell thickness sufficient for strength (0.75–1.25 mm in DIY builds) Instructables+1. Don’t forget venting holes and proper bonding for assembly.
Recommended 3D Printers & Setup Tips
Some printer types or models that are commonly used for larger-scale prints (or at least modular designs):
Prusa i3 MK3 / MK4 (mid-size printers)
Creality CR-10 / Ender series
Big-format printers (e.g. Modix, Voron, custom large frame machines)
Resin / SLA / MSLA units for high-detail parts, smaller components (e.g. fin boxes)
Multi-material or composite printers (for strength)
Tips & considerations:
Print in sections and align with pins or interlocking features.
Account for tolerances / gaps to allow for adhesive.
Use proper shell thickness to maintain strength but reduce weight (commonly 0.75 mm to 1.25 mm shell thickness in DIY builds) Instructables
Venting / pressure relief holes as needed to avoid delamination.
Use strong bonding adhesives or epoxy for joining.
Additional FAQs & Tips
Can you print a full surfboard in one go?
Possibly for small boards on large-format printers, but more often multi-section assembly is used.Which format is best for printing?
STL is most common and widely supported.Why export IGES or STEP?
To allow further CAD-based modification or integration with engineering workflows.Is a 3D printed board strong enough?
With correct shell, infill, and post-lamination, yes; but strength depends on materials and design.How do I waterproof it?
Epoxy, glassing, proper sealing, vacuum bagging, and finishing.

Video: How to design and 3D print a surfboard using AkuShaper
Video: How to finish, glass, and sand a 3D printed surfboard
Try It Yourself
Ready to design your own surfboard in 3D?
With AkuShaper, you can take your idea from concept to printed prototype in just a few steps. Export your design as STL, OBJ, IGES, PDF, or DXF — ready for slicing, printing, or sharing with your local maker space.
Start designing today.
👉 Download AkuShaper or explore it free in Demo Mode to see how easy it is to bring your board to life.
Have you already printed a surfboard using AkuShaper?
We’d love to see it. Tag @AkuShaper or send us your project — we may feature it in our next community spotlight.